Fetch: Secure File Transfer Protocol for Macintosh OS X
Looking for installation instructions?
NOTE: this link requires that you be on the Wellesley Secure wifi network or, if off campus, on the VPN.
Using Fetch
Fetch is an easy-to-use program for transferring files, similar to WinSCP for Windows. It uses the Secure File Transfer Protocol (SFTP) to allow a networked Mac to transfer files directly from or to any connected machine that supports SFTP. Click here if Fetch is not installed on your computer. NOTE: this link requires that you be on the Wellesley Secure wifi network or, if off campus, on the VPN.
- Connecting to a server with Fetch
- Uploading files to the server
- Downloading files to your computer
- Preferences
- Changing where downloaded files are saved
- Creating a new directory (folder)
- Deleting files and folders
- Naming web pages and managing web sites
- Disconnecting/Quitting
- Troubleshooting
Connecting to a server with Fetch
Each academic or administrative department has been assigned a User ID and password by the Wellesley webmaster to transfer files to the Wellesley web server. Contact your department's content provider or the college Webmaster for the User ID and password. Please note: student workers are not allowed to access accounts on www.wellesley.edu.
CS students who need to transfer files to cs.wellesley.edu should have received a User ID and password from their instructors.
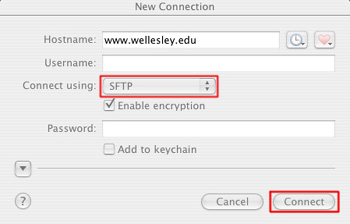
- Launch Fetch. (To keep the Fetch icon on your dock, after launching, click and hold on the icon in the dock, then in the menu that appears, choose Keep in Dock.)
- In the Hostname field, type www.wellesley.edu to upload to the college web site (CS students, use cs.wellesley.edu).
- SFTP (SSH Secure File Transfer) should be selected from the toggle (see illustration below).
- In the Username field, enter your User ID. Your User ID should be eight characters or less, all lowercase. If you have questions about your account name, please contact the Webmaster.
- In the Password field, enter your account password. If you have questions about your password, please contact the Webmaster.
- Do not check the Add to keychain box, so your password remains secure.
- Click the Connect button at the bottom of the window.
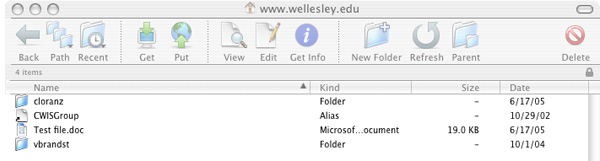
- You should see the main account window.
- Double-click on your folder name to enter your account.
Uploading files to the server
When you upload a file, you place a copy of a file that exists on your computer on the web server. To prevent lost files, please be absolutely sure you are uploading the correct file to the correct location. To upload a file using Fetch:
Top
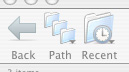
- In the Fetch account window, open the folder to which you want to upload. Double-click folders to open them. To go up a folder level, use Path button.
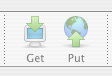
- Click the Put button.
- If you are overwriting files, use the toggle next to If a file already exists: and select Replace existing file to overwrite the file(s) (see illustration below).
- Navigate to select the file to be uploaded, then click the Put button.
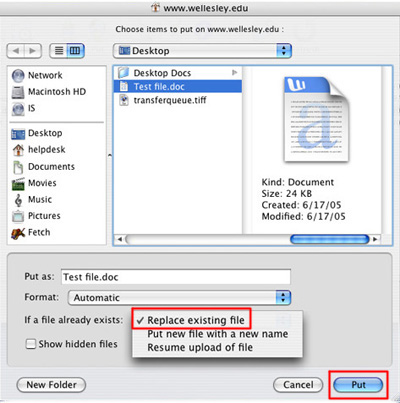
- A transfer complete message will appear in the status pane, located at the bottom of the main window, confirming that the file has been uploaded. For example, if your file is named Test file.doc, the message will read Transfer of Test file.doc complete.

- Alternately, you can drag file(s) or folder from your desktop into the account window. You can also drag items directly into the folder you'd like them to appear in. You may need to click the Refresh button in the account window to see the newly uploaded file(s) or folder.
Note: If you want to put up information which should only be accessible on campus, please contact the Webmaster.

Downloading files to your computer
When you download a file, you place a copy of a file on the server onto your computer. To download a file using Fetch:
- Navigate to the desired file(s) or folder on the server in the account window. Double-click folders to open them. To go up a folder level, use the Path button.
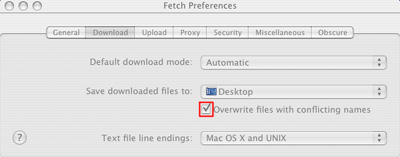
- If you are overwriting files, select Fetch > Preferences... Under the Downloading tab, check Overwrite file with conflicting names. When you're finished, click the red close window button to exit Preferences. To change the default download path, see Preferences.
- Click to select a single file, shift-click to select adjacent files, or option-click to select non-adjacent files, then click the Get button, navigate to where you'd like to copy the files, and click Open.
- A transfer complete message will appear in the status pane, located at the bottom of the main window, confirming that the file has been downloaded. For example, if your file is named Test file.doc, the message will read Transfer of Test file.doc complete
- Alternately, you can drag the files or folder to your desktop. The files will appear on your desktop after you click on the desktop.
Preferences
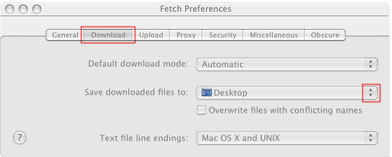
To change the location where files are downloaded, select Fetch > Preferences... Under the Download tab, use the toggle next to Save Download Files to: to choose a new file destination. When you're finished, click the red close window button to exit Preferences.
Creating a new directory (folder)
TopUse the New Folder button, or ctrl-click in the account window and select New Folder.

Deleting files and folders
Before you delete uploaded files, be certain that you have a backup. It is impossible to replace files once you have deleted them. Please be certain you are deleting what you intend to delete.
Find the file or folder you wish to delete and use the Delete button,or ctrl-click on the file(s) or folder and choose Delete Item.

Naming web pages and managing web sites
While directories/folders should always have an initial capital (e.g., Images or RelOrgs), individual files should always be in all lowercase letters. File names should contain only letters and numbers, and no spaces. File names should also be short (up to 10 characters, not counting the .html extension).
The Wellesley Standard requires that all pages end with .html. Other pages on the Internet occasionally end with .htm, but Wellesley requires the full .html so that all pages on the college web site are standardized, and so that our search engine knows which files to index.
Before you create your pages, decide on a naming structure. File names should be unique, but should also make sense to you and indicate the purpose of the file.
Don't change web page file names. If you do, all links to that page will be broken. You should not rename files without a good reason, since the repair and crosschecking required afterwards is often tedious, and can cause difficulties for other people attempting to access your site. If you must rename your site's homepage (this is strongly discouraged), notify your department's content provider and the college Webmaster so that links to your home page can be changed.
We recommend that you keep a complete backup copy of your web site on your computer or a CD or zip disk. When you want to edit your web page, make the change on your backup copy, then upload the changed files to the server. You may also want to keep archival copies of your web pages labeled with the date. Invest the time in creating a system that works for you; unorganized files are confusing, and may cause references to images and links to break.
Disconnecting/Quitting Fetch
To quit Fetch, Go to the Fetch menu and select Quit
Fetch. This will disconnect you from the account and quit the program.
Troubleshooting
- Fetch will not connect to the SFTP host
If Fetch displays a message similar to "Warning: the RSA host key for 'ftp.example.com' differs from the key for the IP address '192.0.34.166'" when opening a connection to an SFTP server, it may indicate that the host's ssh key has changed. In order to re-establish your connection to the host follow these steps:
- Quit Fetch.
- In the Finder, choose Go > Go to Folder. The Finder will display a prompt.
- Type "~/.ssh" (without the quotes) into the prompt, and click the Go button. The Finder will display a window showing the contents of the .ssh folder.
- Select the known_hosts file, and drag it to the Trash.
- Close the window and re-launch Fetch.
After deleting the known_hosts file, the first time you connect to a server you may be warned that the authenticity of the host cannot be established. This is normal - click the "Accept..." or "OK..." button to proceed.