
Scanning 35mm Slides/Film Using NikonScan 4
Table of Contents
Where to Scan Mounted Slides and Strips of 35mm film
Slide and negative scanners are available in the Knapp Media and Technology Center at stations 22 & 23.
Getting Started
Make sure the slide scanner is turned on before the computer. If the slide scanner is off, shut down the computer, turn on the scanner, then restart the Mac.
Mounted Slides
Make sure the shiny surface of the slide is face up (the mounting on the shiny side often has writing on it) with the short side of the slide facing the scanner, proceed to Scanning Slide/Film Strip.
35mm Film Strips
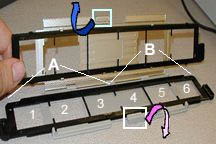
The 35mm film needs to be placed into the Nikon film-strip carrier before it can be scanned. Please follow the steps below before putting the film in the scanner.
1. Checkout the film-strip carrier from the Knapp Center Service desk.
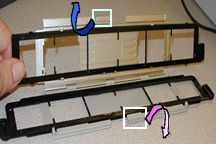
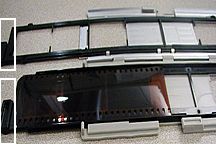
2. Hold the film-strip carrier with the Nikon logo on top.To Insert The Film In The Carrier
Once the film is inserted in the carrier, proceed to Scanning Slide/Film Strip
Scanning Slides/Film Strip
Creating a Preview Image of the Slides/Film Strip
- When scanning a mounted slide, make sure the shiny surface of the slide
is face up, then insert the slide into the scanner. When scanning film,
insert the film-carrier into the scanner.
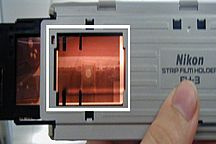
(Please refer to the images below: ) *Note: The strip carrier will not
go in all the way.
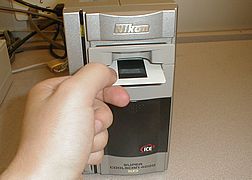
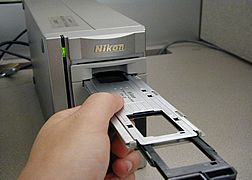 Inserting a mounted slideInserting the film-strip carrier (Nikon sign is facing up)
- From the Go menu, choose Applications > NikonScan > NikonScan 4
- An image of a previously scanned picture may appear in the Nikon scanning window. If so, ignore the image and continue with step 5.
- In the Nikon scanning window choose the
type of film to be scanned from the Settings menu.
- If you are scanning a slide, select Positive.
- If you are scanning a film strip in color, select Negative Color.
- If you are scanning a film strip in black and white, select Negative Mono.
- Choose a setting in the color-model menu.
- If you are scanning a color slide or color film choose Calibrated RGB.
- If you are scanning black-and-white (monochrome) slides or film, the Grayscale option is the best choice.
- Click the Preview button to create a preview of the image to be scanned.
To rotate the image:
- Open the Layout Tools palette by clicking the triangle at its top left corner.
- Use the four arrow buttons in the upper right corner of Layout Tools window to rotate the preview image (see red box #1).
- To crop the image:
- If it is not open, open the Crop palette by clicking the triangle at its top left corner.
- Make sure the bullet next to Keep this Crop is selected (see red box #2).
- In the Nikon Preview Window, drag the cross-hair mouse icon over the area of the image you wish to scan. The box drawn around the image using the cross-hair mouse icon defines what area will be scanned.
- Set the output size for the image:
- For screen display:
- Make sure the bullet next to Keep this Output Size is selected (see red box #3).
- Select Pixels in the drop down menu.
- Type in the desired width or height of the image. The other dimension will be automatically calculated to keep the image in proportion. Note: maximum screen display on campus is 1024x768.
- For print:
- Make sure the bullet next to Keep this Output Size is selected (see red box #3).
- Select Inches in the drop down menu.
- Type in the desired width or height of the image. The other dimension will be automatically calculated to keep the image in proportion.
- For archival purposes:
- Make sure the bullet next to Keep this Output Size is selected (see red box #3).
- Select Pixels in the drop down menu. Set the longest edge of your image to 3072 pixels (for a horizontal image, the width would be 3072 pixels; for a vertical image, the height would be 3072 pixels if you correct the orientation of the image - see To Rotate the Image).
- Set the resolution for the image:
- For screen display:
- If you are scanning an image only for display on a screen, set the Resolution to 72 pixels/inch (see red box #4). Learn more about How Image Resolution Works for Images Displayed on Screens.
- For print:
- If you are scanning an image for print, set the Resolution between 150-300 pixels/inch (see red box #4).
- For archival purposes:
- If you are scanning an image for archival purposes, set the Resolution to 2400 pixels/inch (see red box #4).
Scan a Slide or Film Strip
-
When all editing is done, click
the Scan button to scan the image.
The image will be opened in the NikonScan window. Choose File > Save as and save your image on the desktop.
**If you wish to scan more than one image on your negative, continue to #3. If not, skip to Remove Slide/Film from Scanner.
- To scan another frame on your negative strip, push the black carrier one viewing space until it clicks into place. Repeat steps 2-7 in Creating a Preview Image of the Slides/Film Strip and steps 1-3 in Editing the Image. You can only scan up to three adjacent frames on the negative strip without removing the carrier.
- To scan the remaining frames, you must eject the film-carrier from the scanner (see directions below) and flip the carrier around, keeping the Nikon sign face up, and insert the other end first. Repeat steps 1 - 3.
Remove Slide/Film from Scanner
To eject the slide/film-carrier from the scanner, press the eject button (underneath where you insert the slide/film carrier) and grasp film carrier by silver part to pull out. Gently pull the slide/film-carrier the rest of the way out of the scanner.
Back to Top