Dreamweaver
MX
Macintosh and Windows
|
|
Dreamweaver |
Site Management Features in Dreamweaver MX
The QuickTag editor allows you to efficiently enter tags for selected material without opening the source window to edit the source.
To add an HTML tag with the QuickTag Editor:
- Select/highlight the object (text, image, etc.) to which you would like to add the tag.
- From the Modify menu, choose QuickTag Editor
- A small box will appear with an html tag. A drop down menu with all possible tags to apply will also appear after a short time. Double-click on a tag from the list.
- Click back on the document when you are finished.
Sometimes we must repeat the same steps in our web pages over and over again. For example, we may want to change all of our section headings to blue, Times New Roman and size 5. Dreamweaver makes it possible to create a Temporary Command so that you can do all of the steps with one click.
A Temporary Command will last until you quit out of Dreamweaver, or until you create a new Temporary Command. You can close a document and open another (as long as you don't quit out of Dreamweaver in the process) and still use the Temporary Command that you created.
Unfortunately, Dreamweaver cannot record any mouse movements as part of your Temporary Command. Any clicks or drags will prompt an error message.
To create a Temporary Command:
- From the Commands menu, choose Start Recording
- Execute the steps that you would like to put in your command (Remember, Dreamweaver cannot record your mouse movements such as clicks and drags. If you are performing a command on text, for example, highlight the text and then start recording the command.)
- From the Commands menu, choose Stop Recording
- To execute the command, from the Commands menu, choose Play Recorded Command
The History Inspector records your actions in a Dreamweaver document, and allows you to perform several useful functions including multiple undos, repeating an action or group of actions, and creating "permanent" commands. Unfortunately, it cannot record many mouse movements, but all keystrokes are recorded as well as menu choices and actions in the Properties Inspector.
By default the History Inspector records up to 50 actions, but you can alter this number in the Dreamweaver Preferences. The History Inspector maintains a separate list of actions for every document that you have open and empties out as soon as you close a document.
The History Inspector Explained:
To perform multiple undos at once:
- From the Window menu, under Others, choose History to open your History Inspector.
- Scroll to find the last step that you would like to include.
- Click on the gray vertical bar on the left of the History Inspector window next to the last step that you would like to include.
- All of the steps after the one you selected will be undone and will be shaded in gray in the History Inspector
- If you change your mind, you can continue clicking until you have determined the correct number of undos that you want.
As soon as you perform a new action ALL of the grayed out actions will be permanently erased from the History Inspector and cannot be recovered. You will have to perform these steps again.
Note: You cannot pick and choose the actions that you would like to undo. You can only select the actions from the end of the History Inspector list.
To repeat an action or series of actions:
- From the Window menu, choose History to open your History Inspector.
- Select the actions that you would like to repeat by clicking on them.
- If you would like to repeat more than one action, hold down the SHIFT key while you select them.
When you have selected all of the actions that you would like to repeat, click on the Replay button in the History Inspector window.
Note: The selected actions cannot be replayed out of order.
In Dreamweaver, a "Permanent" Command is one that appears in the Commands menu. You can add and delete your own commands from this menu. Because you can delete these commands, they are not truly permanent, but they will remain in the Commands menu even after you have quit out of the Dreamweaver.
To create a "Permanent" Command:
- From the Window menu, under Others, select History to open the History Inspector.
- Perform the actions that you would like to record as a permanent command.
- In the History Inspector, select the actions you would like to save as a command.
- If there are multiple actions, hold down the SHIFT key as you select them.
- When you have all of the actions selected, click on the disk button
in the bottom right corner of the History Inspector window.
- When prompted, enter a command name and click OK
- The command is now saved in the Commands menu.
To delete a "Permanent" Command:
- From the Commands menu, choose Edit Command List
- Select the command you would like to delete by clicking on it once.
- Click on the Delete button.
Before using any of the following advanced features in Dreamweaver, you must first create a Site Definition for the web site files that are stored on your local computer. To do this, all of the HTML and graphic files (.gif and .jpg) for the web site must be saved in the same folder on your computer.
If you do not already have a "site" folder on your computer that contains all of these files, you will need to create one.
- Create a new folder on your desktop (or wherever you would like your web files to be saved).
- Find all of the HTML and graphics files for your web site.
- Drag the files to the new folder that you created.
IMPORTANT: If you have your files stored in different folders, drag each FOLDER into the new site folder. Removing the files from your folders will result in broken links and missing images!
To create a Site Definition:
- From the Site menu, choose New Site...
- A site definition window will open on your screen.
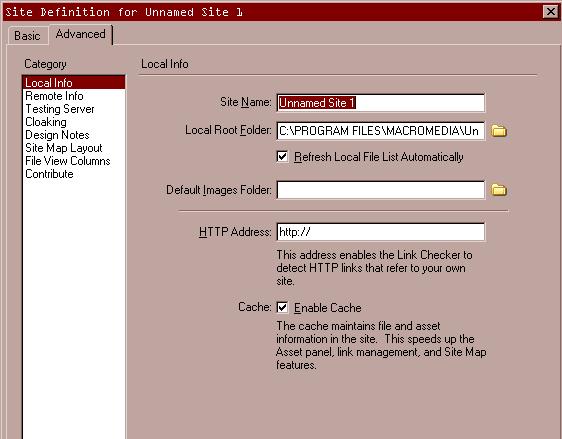
- Verify that Local Info is selected in the Category list on the left.
- Type a name in the Site Name field. This name appears nowhere on your web site and is used only by Dreamweaver.
- Click on the folder next to the Local Root Folder field and browse to find your site folder.
- Select your site folder and click Open then click Select
(**on a Mac, select your site folder and click Choose)
- Now select Site Map Layout from the category list on the left.
- Click on the folder next to the Home Page field.
and browse to find your site's home page in your site folder.- Select your home page and click Open
- Click OK
- A window will appear asking you if you want to create a cache file for this site. Click Create
- A site map window will open after a few seconds letting you know that you have completed the process. You can close this site map window and continue working with your web page.
Note: This Site Definition now lives on the computer that you are currently working on. If you should remove the site files from this computer (move them to a disk or erase the folder) you will see an error message each time you open Dreamweaver asking you where the files have gone. If you remove the site files from your computer, you must also remove the Site Definition.
To remove a Site Definition from your computer
- From the Site menu, choose Edit Sites...
- In the dialog box, select the Site Definition you want to remove by clicking on it once.
- Click on the Remove button.
- Click on the Done button.
The Site Map feature allows you to browse through all of the files included in your Site's folder and provides a map of how these files are linked together in your web site To use this feature, you must create a Site Definition for your web site.
Opening the Site Map:
- From the Site menu, choose Site Map
- The Site Map window will open.
- On the right side of the window, there is a list of your Site's files arranged in their folders.
- On the left side of the window, there is a map of the files (beginning with the home page) and how they are linked together. External links are shown, but cannot be checked.
Using the list of files:
- To open one of the files, double-click on the file.
- To move a file to a new directory, drag it to a directory in the list. Choose to update links when asked.
- To delete one of the files, highlight the file by clicking on it once and then from the File menu, choose Delete
- To add new files to your site, from the File menu, select New File. Name the file.
- For other functions of the list of files, from the Help menu, choose Using Dreamweaver and search for Site Map
Using the Map:
- To open one of the files, double-click on the file
- To see more of the map, click on the plus signs (triangles on the Mac) next to the file you want to expand on
- To see more of the map at once, click on the 100% in the bottom left corner of the Site Map window. Choose to view the file at a smaller percentage
Dreamweaver provides a feature that will allow you to check all of the LOCAL links in your web site. Dreamweaver will check to make sure that the links between pages within your web site are correct and that you do not have any orphaned files (images or html files that are not included on your web pages). This feature will NOT check remote URLS that you have linked to. You must still check links to remote URLS on your own. For the link-checking feature to work, you must create a Site Definition for your web site.
Checking your links:
- Open one of the Site's HTML documents in Dreamweaver.
- From the File menu, under Check Page, choose Check Links
- A dialog box will appear.
- From the Show pull-down menu, you can choose to see the Broken Links in your site, a list of External Links (Dreamweaver does NOT verify that these links are working), and a list of Orphaned files
- Click Close to close the window.
Libraries contain frequently used elements (images, text, tables, etc.) for your web site. Files contained in the Library are called Library Items and are references to the original items. Editing a library item will change the original item file. You can update the edited item in all files in the web site at once.
Note: In order to use the Template feature in Dreamweaver, you must first create a Site Definition for your web site.
- Select the part of the document to be used as a library item by clicking on it once.
- From the Modify menu, choose Library and then Add Object to Library
- Type in the name for the new library item.
- Close the Library window.
Deleting an Item from the Library:
- Open one of the Site's pages in Dreamweaver.
- From the Windows menu, choose Library
- Select the item you want to delete from the library by clicking on it once.
Click on the trash can button in the lower right corner of the library window.
- Click Yes when asked if you want to delete the file.
- Close the Library window.
Note: Deleting the file from the Library does NOT delete the original file. The file is still stored in its original location, and will still appear in the document. If you delete a file from your Library, you will still need to return to the library items in your document and detach them from the Library.
Adding a Library Item to your document:
- Place the cursor in the document where you would like the Library Item to be inserted.
- From the Window menu, select Library
- Select the Library Item that you want to insert by clicking on it once.
Click on the Insert button in the Library window to insert the item into the document.
- Close the Library window.
- Open one of the Site's pages in Dreamweaver.
- From the Window menu, select Library
- Open the Library Item by double-clicking on it.
- Edit the Library Item.
- When you have finished editing, from the File menu, choose Save
- A dialog box may appear asking you to update your files.
- Click Update to update all of the HTML documents that contain this Library Item.
Note: If the Update dialog box does not appear, it is likely that you may have (unknowingly) asked Dreamweaver to Update your library files automatically the last time you changed a Library Item.
Detaching an instance of an element from the Library Item:
There are times when you may need to edit only one instance of a Library Item on a specific web page. To do this, you will need to detach the instance from the Library Item.
Note: If you do this, you will no longer be able to update the detached instance automatically when the Library Item is changed.
- Select the instance of the Library Item in your document.
- In the Properties window, click Detach from Original
Although Dreamweaver offers a "template" feature, we have found that it is more complicated than the vast majority of our users need.
Instead of using templates we recommend that you use one html file as a base for all of the pages in your site.
- Create a new html file with your graphics, menus, and other design elements and save it with a recognizable filename such as sitedesign.html.
- From the File menu choose Save As
- Give the page a new name (english_home.html, campus_map.html, etc.)
- Add your text and then save the page.
- To start your next page, open your original sitedesign.html page and choose Save As again.
- You can continue doing this, creating all of the necessary pages for your site with the same design.
You can, of course, use the Dreamweaver template feature. To do so, follow the instructions available under the Dreamweaver Help menu.