Dreamweaver
8
Macintosh and Windows
|
|
Dreamweaver |
- What is a form?
- Creating a new form
- Adding an object to a form
- The Done! Page
- Making the Form Work with: (instructions for the main college web server only)
- Data Forwarded by Email
- Data Stored in a CSV File (comma-separated value, spreadsheet format)
- Creating the CSV File on the Server
- Email Copy of Results to User
- Adding a Timestamp to CSV Results
Forms allow you to collect information from users via the web. Forms can be used for surveys, information gathering, online quizzes, applications, etc. Results from forms at Wellesley can easily be sent to an email address or to a FirstClass conference that is set up to receive internet mail. Results can also be stored in a CSV file on the server, then downloaded and opened in a spreadsheet application.
You can use Dreamweaver to create and add objects to your forms. At Wellesley your forms can include objects such as text fields, buttons, checkboxes, radio buttons, and list/menus as well as text, tables, and images.
- From the Insert menu choose Form. A red border will appear.

This red border marks the boundaries of your form. All of your form objects MUST appear inside this border. You should have only ONE of these red borders on each webpage. As you add objects to your form, be sure that you are inserting them within the red border.
- Next, set the properties for the form so it knows how to process the data it receives.
- In the Action Field enter http://new.wellesley.edu/cgi-bin/wcform.pl
- Verify that the Method is set to POST.
Form objects include things like check boxes, buttons, and text fields that users can type into. For each object you add to a form you must complete two steps: you must first insert the object and then you must set the properties for that object in the Property Inspector. You must do BOTH steps for every object you insert.
There are two ways to insert form objects into your Dreamweaver document.
1. From the Insert menu choose Form Object and then select an object from the menu
or
2. Click on the object you would like to insert on the Forms panel of the Insert window.
To see the Forms panel of the Insert window, click on the small black arrow next to the panel title (this probably says Common). In the menu that appears, select Forms.

You can continue reading through this document, or you can click on a form object to jump to instructions on how to insert it.
When you insert a form element in Dreamweaver 8, the following window may appear:
<<More information on labeling>>Text Fields
An Example text field:
Text fields allow users to type text into the form. The entered text can be displayed as a single line or as multiple lines. You can type text in this text field to try it out.
To insert a Text Field:
- From the Insert menu choose Form Object and then Text Field (or click the
button on the Forms panel of the Insert window)
To set the Text Field properties:
- Click on the text field in your Dreamweaver document
- In the Property Inspector find the TextField box and type a descriptive name for your text field. (By default this may already be called textfield, or textfield1, etc. but it is important that you give it a better name. In the above image, the text field has been named Comments.) If this is a required field, the name must begin with an underscore. For example, to make the above required, the name would be _Comments.
Note: The name should have no spaces and should not begin with a number. Do not use punctuation other than an underscore ( _ ) or a hyphen (-).
- In the Char Width box, specify a width (number of characters) for your text field
- Choose whether you would like your text field to be a Single line or a Multi line box.
- If you choose to have a Single line box:
In the Max Chars box, enter the maximum number or characters you would like users to be able to enter. If you leave this box empty, users will be able to enter an unlimited number of characters.
- If you choose to have a Multi line box:
- In the Num Lines box, specify a height (number of lines) for your text field
- From the Wrap menu, select a wrap setting (Choosing Virtual will allow the text to wrap in the text box and also to wrap properly in an email or conference posting.)
Buttons
A button performs a task when clicked, such as submitting or resetting the form. You can label a button with any title.
To insert a button:
- From the Insert menu choose Form Object and then Button (or click the
button on the Forms panel of the Insert window)
To set the button properties:
- Click on the button in your Dreamweaver document
- In the Property Inspector find the ButtonName box and type a descriptive name for your button. If this is a required field, the name must begin with an underscore.
Note: The name should have no spaces and should not begin with a number. Do not use punctuation other than an underscore ( _ ) or a hyphen (-).
- In the Label box, specify a button label (the text that appears on the button) . The Label does not have to be the same as the ButtonName and can include spaces and punctuation if necessary.
- Choose an action for your button. Usually you will choose either Submit form or Reset form.
Checkboxes
Choose as many as you like:
red orange yellow green blue purple Checkboxes allow users to select multiple items from a single group of options.
To insert a checkbox:
- From the Insert menu choose Form Object and then Checkbox (or click the
button on the Forms panel of the Insert window)
To set the checkbox properties:
- Click on the checkbox in your Dreamweaver document.
- In the Property Inspector find the CheckBox box and type a descriptive name for your checkbox.
Note: If you are inserting a group of checkboxes (like the example group above) all of the checkboxes in the group must have a DIFFERENT CheckBox name. For example, in the group of checkboxes above I could choose to name them Color, Color1, etc. Sometimes it makes sense for the name and the value of each checkbox to be the same.
Note: If this is required, the name must begin with an underscore. For example, to make the above required, the name would be _Color.
Note: The name should have no spaces and should not begin with a number. Do not use punctuation other than an underscore ( _ ) or a hyphen (-).
- In the Checked Value box, type in the value of the checkbox. This is the value that is set (and sent in the email/conference posting) when the checkbox is selected (checked).
- Choose whether you would like the checkbox to be Checked or Unchecked by default.
Radio Buttons
Select one:
one two three Radio Buttons allow users to select only ONE item from a group of options
To insert a radio button:
- From the Insert menu choose Form Object and then Radio Button (or click the
button on the Forms panel of the Insert window)
To set the radio button properties:
- Click on the radio button in your Dreamweaver document.
- In the Property Inspector find the RadioButton box and type a descriptive name for your radio button.
Note: If you are inserting a group of radio buttons (like the example group above) ALL of the radio buttons in the group must have the same RadioButton name. Each group of radio buttons will need to have a distinct name.
Note: If this is required, the name must begin with an underscore. For example, to make the above required, the name would be _Number.
Note: The name should have no spaces and should not begin with a number. Do not use punctuation other than an underscore ( _ ) or a hyphen (-).
- In the Checked Value box, type in the value of the radio button. This is the value that is set (and sent in the email/conference posting) when the radio button is selected.
- Choose whether you would like the radio button to be Checked or Unchecked by default.
Lists or Menus
Using the shift or control (apple) keys select multiple towns from this list:
Select one state from the menu:
Lists and Menus present a set of values from which users can choose. A List will display a number of values in a scrolling list and will allow the user to select multiple items at once. A Menu displays all of the options when it is clicked on and will allow the user to select only one item.
To insert a list or menu:
- From the Insert menu choose Form Object and then List/Menu (or click the
button on the Forms panel of the Insert window)
To set the List/Menu properties:
- Click on the list or menu in your Dreamweaver document.
- In the Property Inspector find the List/Menu box and type a descriptive name for your list or menu. If this is a required field, the name must begin with an underscore. For example, to make the above required, the name would be _States.
Note: The name should have no spaces and should not begin with a number. Do not use punctuation other than an underscore ( _ ) or a hyphen (-).
- In the Type box, choose whether you would like to have a Menu or a List
- If you choose List:
- In the Height box, specify a height (number of items) for your list . This does not limit the number of items in the list. It only limits the number of items that are visible before the user begins to scroll.
- Choose to allow multiple selections by checking the Selections - Allow Multiple box
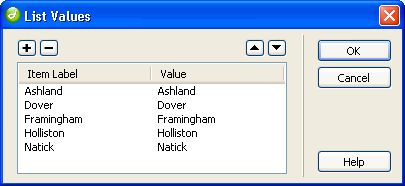
- Click the List Values... button. A List Values window will open.

- To add an item to the list, click on the + button.
- Click under Item Label and type the label that you would like to appear in the list.
- Click under Value and type the value. Although they do in this example, the Label and the Value do not need to match.
- To change the order of the items, select an item and use the arrow buttons to move the item up or down in the list.
- To remove an item from the list, click on the – button.
- When your list is complete, click OK.
- In the Property Inspector, choose the item you would like to display by default in the Initially Selected box.
Jump Menus
A jump menu is a pop-up menu of options each of which can link to documents , URLs, etc. Because this menu acts as more of a navigation tool, it is described with the other navigational menu options on the Beyond the Basics page. Click here to learn how to insert a Jump Menu.
To use a different page than the default Done! page, create an HTML page and save it in the same folder as the form.
- Create a hidden field by choosing Insert > Form Object > Hidden Field. The hidden field icon will appear.

- In the Property Inspector, find the HiddenField box. Type DONESCREEN.
- In the Value box type the URL where the page you have created will be located on the server, e.g., http://new.wellesley.edu/French/Forms/newdonepage.html
The responses to your form can be emailed to individuals or conference, or can be stored on the server in a CSV (comma-separated value) file. This file can be downloaded and opened by a spreadsheet program like Excel.
After the form has been created, you have to follow a few more steps to make it work. First, you must create a template file that tells the form how you would like the responses to be formatted. Second, you must add two hidden fields that will tell the form how to find the template and where to send the data in the form. Third, if you are using a CSV file to store responses, you'll need to login to the server to create the CSV file.
Note: These instructions will work with the main college web server. Check with the server administrator of other servers (Wilbur, Nike, etc.) to find out how to make your forms work on those servers.
1. Creating the Template
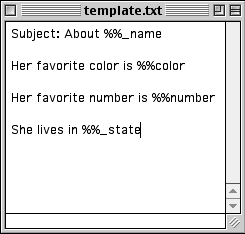
The template is a text file that determines how the data will be presented in the email response from the form.
- Open up a new document in any text editor such as NotePad or Simple Text. Do not use Microsoft Word.
- On the very first line, you can enter the text that should appear in the subject line of the email respsonse. It must read Subject: followed by the text you would like in the subject line of the email.
- Enter a blank line.
- Add additional text, punctuation and spacing to your template in order to structure the data to your needs. Whenever you want to add data from a form field, type %% followed immediately by the field name. The field name must match the form EXACTLY. Include one blank line at the bottom of the template.
Note: Remember that required fields must be preceded by an underscore ( _ ) in both the form and the template.
Note: For groups of checkboxes, you must list each checkbox separately by its field name.
- Save the template. Make sure it is saved as a .txt file and has the .txt extension.

When the template is complete it should be uploaded to the server along with the completed form. You must follow the instructions for inserting the Hidden Fields before the form is complete.
2. Adding the Hidden Fields
To create the hidden fields needed to send the form, open the form in Dreamweaver. Click inside the red border after all the other fields.
The first hidden field tells the form how to find the template.


The second hidden field tells the form where to send the data.
- Create another hidden field by choosing Insert > Form Object > Hidden Field. The hidden field icon will appear.

- In the Property Inspector, find the HiddenField box. Type EMAIL. Make sure EMAIL is in all caps.
- In the Value box type the email address of the user or conference that will receive the results of the form. Multiple addresses should be separated by a space. Any addresses that are off-campus (non-wellesley.edu addresses), should be listed at the end. Make sure at least one address is an on-campus email address, so you'll have a record of the response.
Upload the form and template file to your account and test!
1. Creating the Template
The template is a text file that determines how the data will be presented in the email response from the form.
- Open up a new document in any text editor such as NotePad or Simple Text. Do not use Microsoft Word.
- To add data from a form field, type %% followed immediately by the field name. The field name must match the form EXACTLY. Keep the field names on one continuous, wrapping line, separate the field names by commas.
Note: Remember that required fields must be preceded by an underscore ( _ ) in both the form and the template.
Note: For groups of checkboxes, you must list each checkbox separately by its field name.
Save the template. Make sure it is saved as a .txt file and has the .txt extension.

When the template is complete it should be uploaded to the server along with the completed form. You must follow the instructions for inserting the Hidden Fields before the form is complete.
Note: CSV files should be stored in a separate, local-only folder to prevent from appearing in search results. Name the folder LocalOnly and contact the webmaster about making the folder viewable on-campus only. This will exclude the contents of the folder from searches.
2. Adding the Hidden Fields
To create the hidden fields needed to route the form, open the form in Dreamweaver. Click inside the red border after all the other fields.
The first hidden field tells the form how to find the template.
Add a hidden field named csvfilein, value template.txt
csvfileout, value outputfilename.csv

The second hidden field tells the form where to send the data.
- Create another hidden field by choosing Insert > Form Object > Hidden Field. The hidden field icon will appear.

- In the Property Inspector, find the HiddenField box. Type CSVFILEOUT.
- In the Value box type the filename of the CSV file that you will create in the next step, for example, results.csv

3. Creating the CSV File on the Server
Windows Users - PuTTY Mac Users - Terminal
- Log in to Putty: Start > All Programs > Putty > PuTTY.
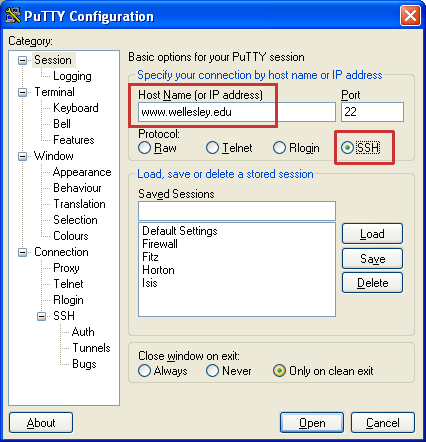
- In the Host Name field, type www.wellesley.edu, then under Protocol, click the SSH radio button, then click Open.

- A black screen will appear with the word login as:
Type your account username, and when prompted, your password. This is the same account username and password used to upload to the server. The username should be eight characters or less, all lowercase. If you have questions about your account username, please contact the Webmaster. When you have logged in to your account, you should see a $ prompt:

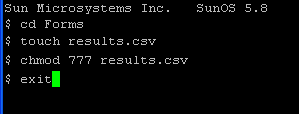
- You will need to go down into the directory (folder) structure to locate the level at which your form resides. To see where you are in the directory structure, type ls and the items at the current level will be displayed. You'll have to enter your account, typing, for example cd French. If you need to go down a folder level to where the form and template file are kept, for example, into a folder named Forms, type cd Forms. If you've done this correctly, a new line with a $ prompt will appear under the text you entered.
- Next to the $ prompt, type touch results.csv or whatever filename you specified in the CSVFILEOUT hidden field in your form. If you've done this correctly, a new line with a $ prompt will appear under the text you entered.
- Next to the $ prompt, type chmod 777 results.csv or whatever filename you specified in the CSVFILEOUT hidden field in your form. If you've done this correctly, a new line with a $ prompt will appear under the text you entered.
- Type exit and Putty will close. Steps 4-7 will look like this:

The CSV file should be left on the server for as long as the form is published. To gather the results, download the CSV file and open it in a spreadsheet application like Excel.
Upload the form and template file to your account and test!
- Log into Terminal: Go > Utilities > Terminal
- Type ssh username@www.wellesley.edu, and push return on your keyboard. When prompted, enter your password. This is the same account username and password used to upload to the server. The username should be eight characters or less, all lowercase. If you have questions about your account username, please contact the Webmaster. When you have logged in to your account, you should see a $ prompt:
- You will need to go down into the directory (folder) structure to locate the level at which your form resides. To see where you are in the directory structure, type ls and the items at the current level will be displayed. You'll have to enter your account, typing, for example cd French. If you need to go down a folder level to where the form and template file are kept, for example, into a folder named Forms, type cd Forms.
- Next to the $ prompt, type touch results.csv or whatever filename you specified in the CSVFILEOUT hidden field in your form. If you've done this correctly, a new line with a $ prompt will appear under the text you entered.
- Next to the $ prompt, type chmod 777 results.csv or whatever filename you specified in the CSVFILEOUT hidden field in your form. If you've done this correctly, a new line with a $ prompt will appear under the text you entered.
- Type exit, and then quit Terminal (Terminal > Quit). Steps 4-7 will look like this:

The CSV file should be left on the server for as long as the form is published. To gather the results, download the CSV file and open it in a spreadsheet application like Excel.
Upload the form and template file to your account and test!
To add a field to a form that allows users to email a copy of the results to themselves:
- Add a form field to collect the email address, name it emailaddress, and add it to the template.
- Name the form thisform (see example of where to fill this in here).
- Add the following bolded code to the code that creates the Submit button so it looks like
<INPUT onClick="document.thisform.EMAIL.value=document.formname.EMAIL.value+','+document.thisform.emailaddress.value" type=Submit value=Submit name=Submit>
Note: emailaddress in the code above is the name of the field that collects the email address, and thisform is the name you've given the form. These names and the corresponding code may be changed, but do not use the fieldname EMAIL -- this name is reserved for use by other functions.
Adding a Timestamp to CSV Results
To add the date and time a form is filled out to CSV results:
- From the Insert menu choose Form Object and then Hidden Field. The hidden field icon will appear.
This icon will not appear when your page is uploaded.
- In the Property Inspector, find the HiddenField box. Type AUTOTIMESTAMP into this box.
- In the Value box type YES.
You don't need to add any additional information to the template (.txt) for this to work.