Dreamweaver
8
Macintosh and Windows
|
|
Dreamweaver |
Menus and Media in Dreamweaver 8
An image map is a way of linking different parts of an image to different locations and are frequently used as menus, or navigational bars.
To create an Image Map:
- Insert an image into your web page.
- Click once on the image to highlight it.
- In the Properties window, find the Map field

- If you do not see the Map field, click on the down-arrow in the lower right corner of the Properties window to expand it.
- Type a short name for your image map in the Map box.
- Below the Map box, there are three shape drawing tools

- Select the Rectangle, Circle or Irregular shape tool to draw a "hotspot" or "clickable area" on your image map.
To create a rectangle or circle shaped hotspot:
- Once the Rectangle or Circle tool is selected, move your mouse over your image map.
- The cursor will have changed to a cross-hair.
- Click and drag over one area of your image that you would like to be linked to another page or image.
- A hazy blue shape will appear on top of your image (This will NOT appear when your page is viewed in a browser.)
- The hazy blue shape represents a clickable area on your image.
- If you would like to move the hotspot, click and drag it to the correct location.
- To make the hotspot larger or smaller, click on it and then grab one of the corner and drag.
- To delete the hotspot, click to select it and then hit the delete key on your keyboard.
To create an irregularly shaped hotspot:
- Once the Irregular Shape tool is selected, move your mouse over your image map.
- The cursor will have changed to a cross-hair.
- Click once on your image map where you would like one of the corners of this hotspot.
- Continue clicking on your image map for each corner of your hotspot.
- A hazy blue shape will appear on top of your image (This will NOT appear when your page is viewed in a browser.)
- The hazy blue shape represents a clickable area on your image.
- When you have finished marking all of the corners of your hotspot, click on the Black Arrow button to the left of the the Shape Tools

- If you would like to move the hotspot, click and drag it to the correct location.
- To make the hotspot larger or smaller, click on it and then grab one of the corner and drag.
- To delete the hotspot, click to select it and then hit the delete key on your keyboard.
After the hotspot has been defined, you will notice that the Properties Inspector has changed to represent the hotspot.
- Link the hotspot by either typing a location in the Link box,
or browsing to another file in your web site (Help with Linking)- Type a short description of the link into the Alt field. This description will be "visible" to those users using a screen reader, or a browser with images disabled.
Note: You can have several hotspots on each image map as long as they all "fit" on the image without overlapping. You can return to the Properties window for each hotspot by clicking once on the hotspot to select it.
If you are using images as "buttons" on your page, you may want to consider adding a set of text links to the page for those users who cannot or who choose not to see the images on your page. If you do not add a set of text links it is essential that you add alt labels to your hotspots.
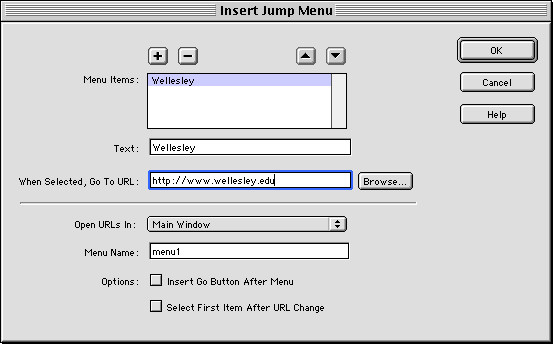
A jump menu is a pop-up menu of options each of which can link to documents , URLs, etc. Although the jump menu will not function in Dreamweaver, you can preview it in a browser to see its actions.
To create a jump menu:
- Choose Insert > Form > Jump Menu, and the Insert Jump Menu dialog box will appear.
- In the Text field, type the name of the item for your menu list.
- In the When Selected, Go to URL field, select the location to open the file, either by selecting the main window or a frame.
- To add more menu items, click on the plus (+) button and repeat steps 2 and 3 above.
- Under Options, check the box for Insert Go Button After Menu
- Click OK and your jump menu will be inserted.
- Click once on your Jump Menu to highlight it.
- In the Properties inspector, make sure that Menu radio button is selected under the Type option.
- Under Initially selected, click on the item that you would like to appear in the "closed" jump menu (If you don't see Initially selected on your screen, click on the arrow in the bottom right corner of your Properties Inspector to open it up).
- While the menu is still selected in your Dreamweaver document window: from the Window menu, select Behaviors.
- The Tag palette will open to the Behaviors tab and there will be a line beginning with onChange.
- Highlight this line and click on the minus (-) button to remove it.
- The Behaviors window should now be empty. Close it.
To edit the items in the jump menu:
- Click once on the jump menu to highlight it.
- In the Properties window, click on the List Values button.
- Click on an item to edit it. To edit the link for an item, click on the link.
- Use the plus (+) and minus (-) buttons to add or subtract options.
- Use the arrow buttons to reorder the options.
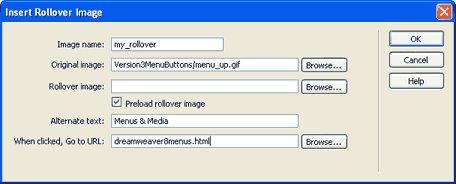
A rollover is a button, which when "rolled over" changes in some way.
Here is an example of a rollover.
A rollover is actually made up of two separate images, which are sometimes referred to as the "up" image and the "over" image. The "up" image of this Beyond Basics rollover has a dark background. This is the image that is showing when the web page loads. The "over" image of this rollover has a lighter background. The "over" image is the image that shows when the user rolls over. When you insert a rollover into your web page using Dreamweaver, Dreamweaver writes the JavaScript required to swap the two images when the user rolls over.
When the user clicks on a rollover button, the rollover acts as a link. This button links to the same section of the web page so you may not see any difference when you link to it. Another example of a rollover button would be the Dreamweaver Basics button at the top of this web page.
Note: Before you insert a rollover into your document you must have the two images already created and saved on your computer. You cannot create the images in Dreamweaver. The two images MUST have the same dimensions (width and height).
To insert a rollover:
- Place the cursor in the document where you would like the rollover to be inserted.
- From the Insert menu, choose Image Objects and then Rollover Image.
- A dialog box will appear.
- In the Image name field, give your rollover a name with no spaces (Ex. my_rollover)
- Click on the Browse button next to the Original image field.
- Browse to find your "up" image.
- Click on the Browse button next to the Rollover image field.
- Browse to find your "over" image.
- Type a short description of the link into the Alternate text field.
- If you want this rollover to work as a button, you must fill in the Go to URL field.
- If you want to link to another page in your web site, click on Browse to find the page.
- If you want to link to an external URL, type/paste the URL in the Go to URL field.
- Click OK. When you look at the rollover on your web page, you will only see the "up" image.
Note: You will not be able to see the rollover work in Dreamweaver. You need to Preview your page in a browser to test it.
To change the "up" image in a rollover:
- Highlight the rollover by clicking on it once.
- In the Properties window, click on the folder next to the Src field.
- Browse to the file that you would like to be your "up" image.
- Hit the ENTER key (RETURN on a Mac)
To change the "over" image in a rollover:
- Highlight the rollover by clicking on it once.
- From the Window menu, choose Behaviors
- The Behaviors window will open with information about your rollover.
- Double-click on onMouseOver
- A Swap Image window will appear.
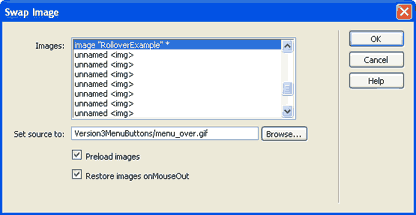
- Click on the Browse button next to the Set source to: field and browse to the image you want to be the "over" image.
- Click OK.
To change the link in your rollover button:
- Highlight the rollover by clicking on it once.
- In the Properties window, change the URL in the Link field.
- If you are linking to another page in your web site, click the folder next to the Link field to browse to your file.
- If you are linking to an external URL, you can either type the URL or copy and paste the URL into the Link field.
A NavBar (short for Navigation Bar) is a "bar" of rollover buttons. In addition to the "up" and "over" images, each button in a NavBar can contain a "down" and a "over while down" image as well.
NavBars can be created in Fireworks MX. Click to jump to the Fireworks MX Navbar Instructions.
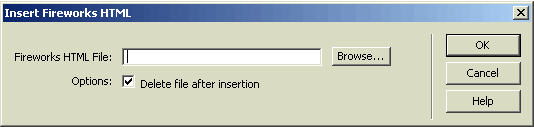
After you have created your NavBar in Fireworks MX, Dreamweaver will allow you to insert it into your web page:
Note: Inserting Fireworks HTML is like inserting an image. If you move any of the image files after inserting the Fireworks HTML, the NavBar will break. Make sure your images and the .htm file are saved in the correct location before continuing.
To edit your NavBar:
- If you need to modify the links for your NavBar, click on the image in the NavBar and change the link in the Properties window.
- If you need to modify the images in your NavBar, you may need to open the PNG file in Fireworks and re-export the entire Navbar. In this case, you would delete the entire NavBar from the web page in Dreamweaver and reinsert the new Fireworks HTML document following these instructions.
- You can use the Properties window or the Behaviors window to change the images in your NavBar, but doing so would require you to export the single parts of your NavBar separately from Fireworks. If you are not comfortable doing this, it would be safer to export the entire NavBar again.
A Flash animation, or swf file can be created using Macromedia Flash. Animations cannot be created in Dreamweaver, but you can insert a completed animation into your web page using Dreamweaver. Like images, animation files must be uploaded to the server with your web site.
To insert a Flash movie:
- Click once on the movie to select it and look in the Properties Inspector to find several options.
- To change the size of the movie, change the width and height of the movie in the W and H boxes
in the Properties inspector.
- The Flash movie will default to Loop and Autoplay. You can change this by unchecking the Loop and Autoplay options in the Properties Inspector.
- To play the Flash movie in Dreamweaver click on the play button
. To stop the movie, click on the the stop button
.
Note: If you do not see the play or stop button in the Properties Inspector, click on the downward pointing arrowin the bottom right corner of the Properties Inspector to expand it.
QuickTime movies can be created in a variety of applications including iMovie and Macromedia Flash. Movies cannot be created in Dreamweaver, but you can insert a completed movie into your web page using Dreamweaver. Like images, movie files must be uploaded to the server with your web site.
Dreamweaver does not automatically detect the dimensions of QuickTime movies, so you must determine the width and height of the movie before you can insert it.
To determine the width and height of a QuickTime movie
- Double click on the QuickTime file to open the movie in QuickTime Player.
- Quit out of the QuickTime Player.
To insert a QuickTime movie
If you are not using poster movies:
Note: If you did not specifically create a poster movie, then your source file is NOT a poster movie.
Click here to find out more about poster movies and why you might want to use them on your web page.
- Click in the location where you would like the movie to appear.
- Click Open.
- Enter the correct width and height for the movie into the W and H boxes.
- By default a controller will be added to your movie so that it can be played, stopped, etc. If you would rather not have a controller, unselect this box.
- If you would like the movie to autoplay or loop, select these boxes.
Note: To the test the movie, preview the page in a browser: from the File menu, choose Preview in Browser and select browser.
If you are using poster movies:
If you are using poster movies you must have the html file containing the movie, the poster movie and the QuickTime movie you are linking to in the same directory. If you do not have all three of these files in the same directory, your movies may not play on the web.
- Click in the location where you would like the movie to appear.
in the Media window.
- Click Open.
- Check the Poster Movie checkbox.
- Enter the correct width and height of the poster movie into the W and H boxes.
To play the movie in Dreamweaver